- Published on
tWIL 2022.10 2주차
- Authors

- Name
- eunchurn
- @eunchurn
나눔스퀘어 네오
나눔스퀘어 네오가 한글날에 맞추어 발표되었다. 본 블로그는 나눔스퀘어를 사용하고 있었고, 약간 아쉬움(한자 지원 x, 굵기)이 있었는데 훨씬 가독성이 좋아져서 나눔스퀘어 네오로 변경하려고 했다. 아직 나온지 얼마되지 않아 웹폰트가 CDN에 배포되어 있지않았다. 그래서 빠르게 나눔스퀘어 웹폰트 패키지를 배포했다. Light, Regular, Bold, Extra Bold, Heavy 굵기의 5가지의 폰트와 Variable 폰트가 배포되어 있다. 5종류의 굵기로 웹페이지가 표현이 되면 좋을 테지만 아쉬운 굵기가 있을 수 있기에 Variable 폰트는 그 대안이 될 수 있다. 하지만 용량이 좀 크다는 것은 감안해야 한다.
5개의 Weight 폰트 사용법은 HTML 헤더에 link태그로
<link
  rel="stylesheet"
  type="text/css"
  href="https://cdn.jsdelivr.net/gh/eunchurn/NanumSquareNeo@0.0.2/nanumsquareneo.css"
/>
Variable 폰트의 경우 HTML 헤더에 link태그로
<link
  rel="stylesheet"
  type="text/css"
  href="https://cdn.jsdelivr.net/gh/eunchurn/NanumSquareNeo@0.0.2/nanumsquareneovar.css"
/>
CSS import방식으로는
- Fixed weight
@import url(https://cdn.jsdelivr.net/gh/eunchurn/NanumSquareNeo@0.0.2/nanumsquareneo.css);
- Variable weight
@import url(https://cdn.jsdelivr.net/gh/eunchurn/NanumSquareNeo@0.0.2/nanumsquareneovar.css);
모든 body태그에 이 폰트를 적용하려면
body {
  font-family: "NanumSquareNeo", sans-serif;
}
이렇게 쓰고, font-weight는 100, 300, 500, 700, 800으로 각각 Light, Regular, Bold, Extra Bold, Heavy로 쓰면 된다. 이 weight 값은 Variable 폰트의 weight와 맞추었다.
.light {
  font-weight: 100;
}
.regular {
  font-weight: 300;
}
.bold {
  font-weight: 500;
}
.extra-bold {
  font-weight: 700;
}
.heavy {
  font-weight: 800;
}
Variable weight 폰트의 경우 아래와 같이 font-family를 설정하고, 여러 Weight를 입맛에 맞게 설정하면 된다.
body {
  font-family: "NanumSquareNeoVar", sans-serif;
}
.variable {
  font-weight: var(--text-weight);
  font-variation-settings: "wght" var(--text-weight);
}
Infrastructure
다시 인프라로 돌아왔다. 지금 한달 째 인프라와 씨름하고있다. 아니 IaC로써 관리 가능한 인프라로... 그냥 인프라를 구성한다면 AWS 콘솔에서 어떻게 어떻게 만들면 되겠지만, IaC는 꼭 필요하다. 스테이징 환경에 따라 인프라들이 조정되어야 하기 때문이다.
CDK to Terraform
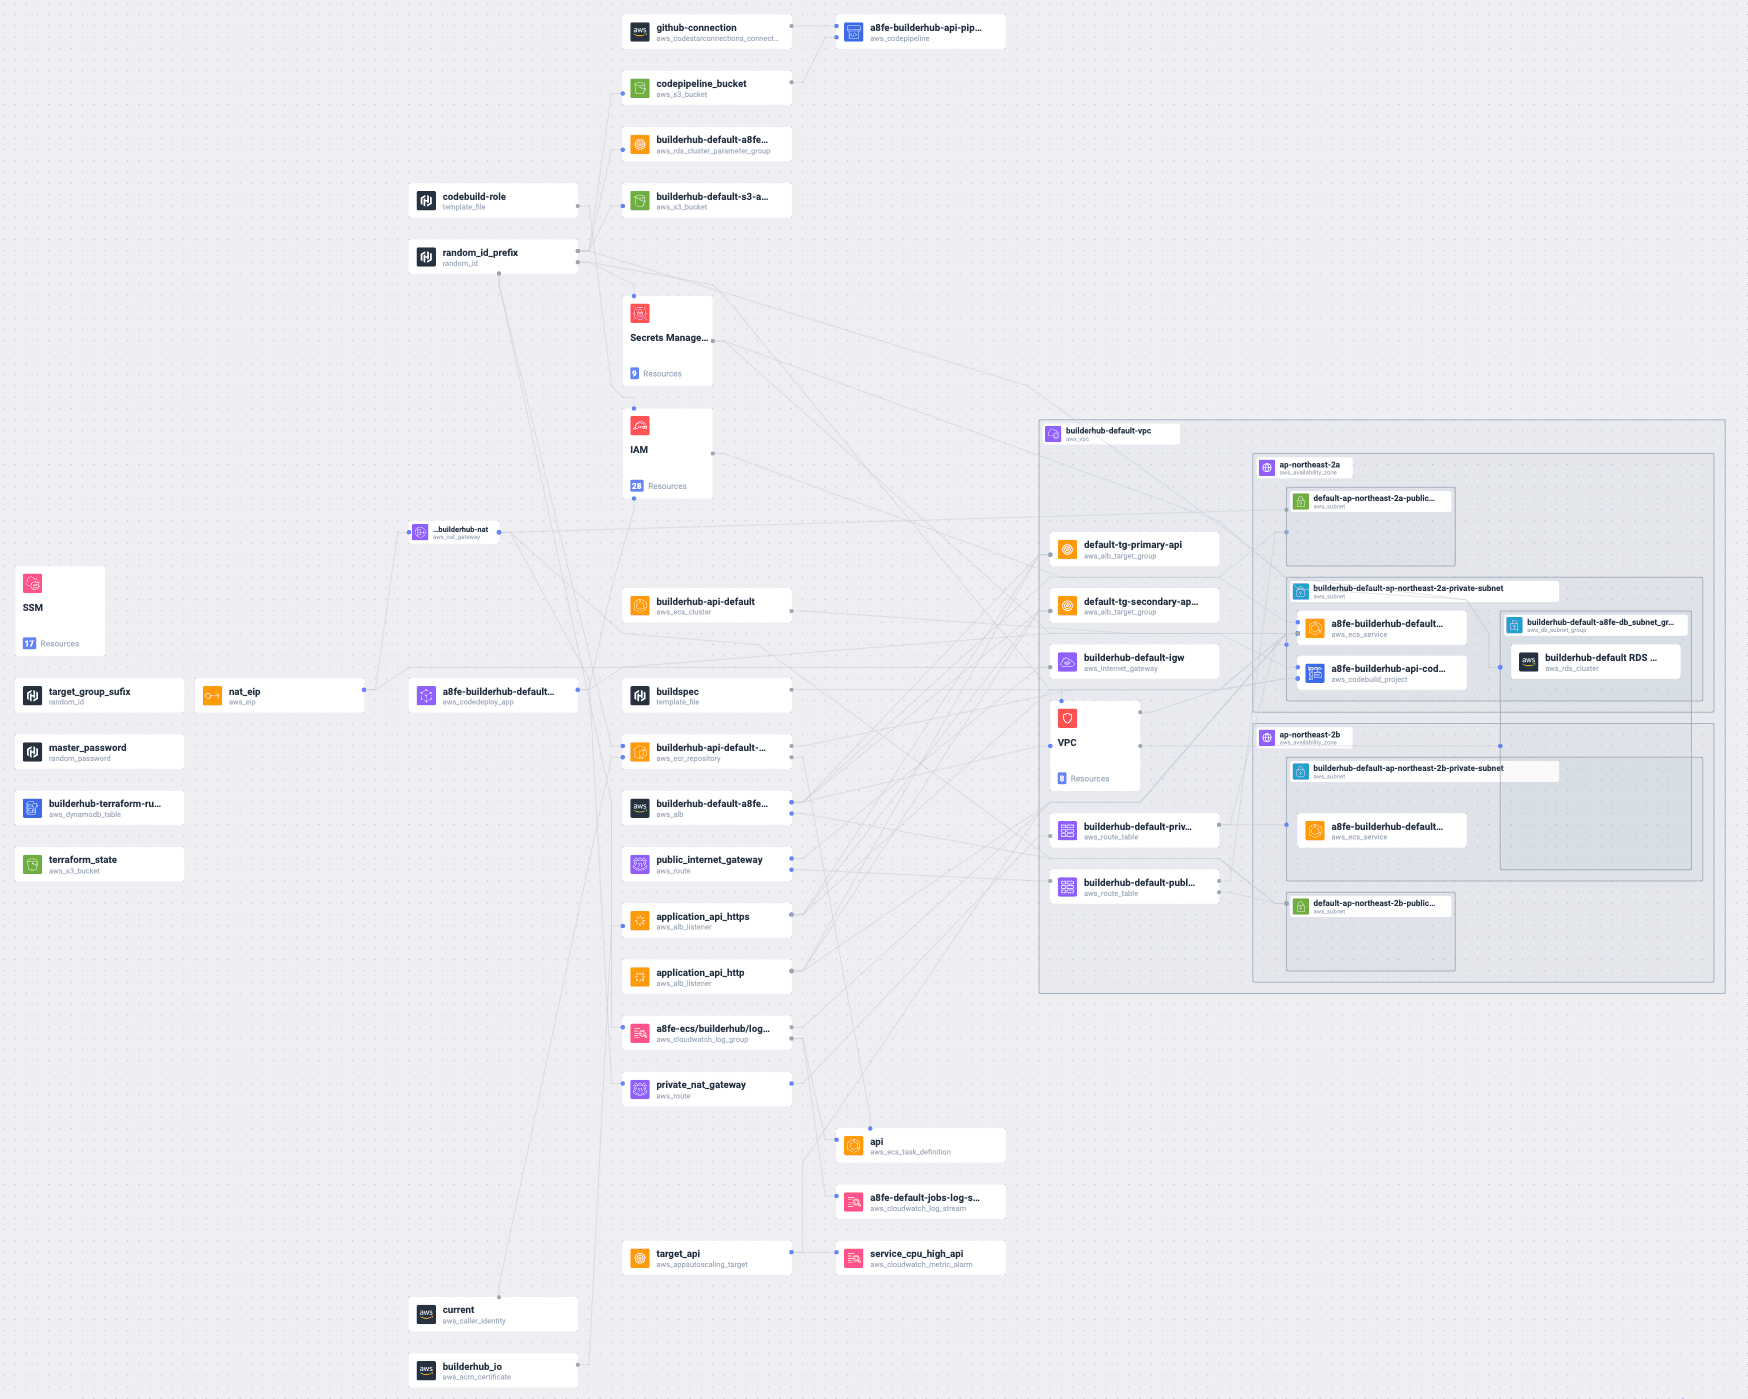
지난 AWS CDK로부터 현재의 인프라 state를 알 수 없는 문제에 대해 Terraform으로 변경하고 하루만에 구성해서 인프라 배포에 성공했다. 러닝커브는 그렇게 높지 않았다. 예상했던 선언적인 언어 형태로 학습하기 어려울 거라는 기대와 달리 HCL(Hashicorp Configuration Language)는 이상하지만서도 유용하고 배우기 쉬운 프로그래밍 언어였다. 2시간만에 책을 독파하고 하루만에 배포한 인프라는 아래와 같다.
- AWS ECS: Fargate, Task definition, AutoScaling, Security Group, Load balancer
- AWS VPC: Subnets, Route, NAT Gateway
- AWS RDS: Aurora PostgreSQL serverless 클러스터, 데이터 KMS key 암호화, Security Group, Secret Manager DB credential 저장,
- AWS S3: Terraform live state를 위한 버킷, CodeDeploy를 위한 버킷
- AWS DynamoDB: Terraform live state lock
- AWS CodeBuild: SSM Parameter Environment
- AWS CodeDeploy: AWS ECR build and push, ECS Task definition update, Blue-Green API
- AWS CodePipeline: AWS CodeStar connect Github branch
- AWS SSM: Parameter store
따로 많은 시간을 내어 Terraform에 대한 학습을 하지 않고 시작한 것 치고 매우 훌륭하게 인프라를 배포할 수 있었다. Terraform module를 이용해서 main.tf, variables.tf, outputs.tf를 만들었는데 의존성 인프라도 depends_on을 통해 상태값을 공유할 수 있었다. 막강한 점은 Hashicorp AWS 모듈은 CloudFormation을 사용하지 않았다. 그리고 State를 로컬이 아닌 Remote로 저장할 수 있는 Terraform backend도 매우 훌륭했다. 그렇게 인프라를 배포한 후 한가지 놓친 것이 있었다. Terraform workspace 인데, 나는 Remote state도 각각 별개로 다른 환경을 만들어 state를 관리할 것 같아. 스테이지별 환경변수를 variable로 관리하고 있었다.
결국 다시 모든 인프라를 지우고, Terraform workspace를 만들었다. development, staging, production 이 3단계로 구성하고, Remote로 상태를 배포해보니 각각 다른 폴더로 env를 관리하게 되었다. 하지만, 최초 배포시에 상태가 없기 때문에 따로 만들어주어야 하는데 로컬에서 default 워크스페이스에서 Remote로 배포했어야 했다. 이 삽질기를 통해 다시 처음부터 인프라 구성을 다시해보기로 했다.
Terraform
참고한 리포는 아래와 같다.
Terraform의 시작은 terraform init이다. 처음에는 API 리포와 함께 작업을 했지만, 생각해보니 MSA 형태로 모든 서비스들이 관리될 걸 예상해서 별도의 리포로 작업하게 되었다.
terraform init
그리고 3개의 workspace를 만들어준다. (Terraform backend 설정 이후에 모두 Overwrite 되니 많은 설정을 하지 않고 backend 설정 이후 본격적으로 시적하는 것으로 한다.)
terraform workspace new dev
terraform workspace new staged
terraform workspace new prod
이렇게 하면 숨겨진 폴더 .terraform과 terraform.tfstate.d가 만들어진다.
.
└── terraform.tfstate.d
    ├── dev
    ├── prod
    └── staged
현재 워크스페이스를 확인하려면 terraform workspace list로 확인한다.
> terraform workspace list
  default
  dev
* prod
  staged
이제 워크스페이스를 dev로 옮겨두고 main.tf를 만들고 Terraform module을 만들어 본다.
terraform workspace select dev
초기 프로젝트 구조는 다음과 같이 구성한다.
.
├── README.md
├── main.tf
├── modules
│   └── terraform-state
│       ├── main.tf
│       ├── output.tf
│       └── variables.tf
├── output.tf
├── terraform.tfstate.d
│   ├── dev
│   ├── prod
│   └── staged
├── terraform.tfvars
└── variables.tf
1단계: 초기 설정
main.tf
Teraform은 루트 폴더에 *.tf파일을 검색해서 엔트리를 찾아낸다. 편의상 main.tf를 기준으로 설정한다. 여기에 민감한 정보(DB 시크릿 암호, API 시크릿)나 변수에 따라 변동이 생길 수 있는 갑들은 variables.tf에 정의해둔다. 그리고 apply를 통해 인프라를 배포하고 난 후 결과를 보고 싶은 변수들은 output.tf에 정의해둔다.
provider "aws" {
  region = var.region
}

# Terraform state management
# https://blog.gruntwork.io/how-to-manage-terraform-state-28f5697e68fa
terraform {
  backend "s3" {
    bucket = "mystack-terraform-running-state"
    key    = "global/s3/terraform.tfstate"
    region = "ap-northeast-2"

    dynamodb_table = "mystack-terraform-running-locks"
    encrypt        = true
  }
}

# variables used across all modules
locals {
  availability_zones = ["${var.region}a", "${var.region}b", "${var.region}c"]
}

resource "random_id" "random_id_prefix" {
  byte_length = 2
}
여기서 변수는 아직 하나다 region 그리고 terraform 블록에는 변수를 사용할 수 없다. 초기에 terraform블록을 설정해 놓으면 오류가 발생한다. 따라서 주석처리 후 로컬에 상태를 저장할 수 있도록 한다.
variables
variable "region" {
  description = "AWS Region"
}
변수는 앞으로 더 늘어날 예정이다.
배포
인프라 정보 혹은 provider등 외부 라이브러리가 필요할 때 terraform init을 꼭 해 주어야 한다. 실수해서 하지 않더라고 하라고 알려준다. 그리고 현재 상태에서 terraform plan을 해본다. backend가 s3로 설정되어있기 때문에, Error: Failed to get existing workspaces: S3 bucket does not exist.에러가 난다. main.tf의 terraform블럭을 주석처리하고 다시 terraform init하면, .terraform.lock.hcl파일이 생성된다.
Initializing the backend...

Initializing provider plugins...
- Finding latest version of hashicorp/random...
- Finding latest version of hashicorp/aws...
- Installing hashicorp/aws v4.34.0...
- Installed hashicorp/aws v4.34.0 (signed by HashiCorp)
- Installing hashicorp/random v3.4.3...
- Installed hashicorp/random v3.4.3 (signed by HashiCorp)

Terraform has created a lock file .terraform.lock.hcl to record the provider
selections it made above. Include this file in your version control repository
so that Terraform can guarantee to make the same selections by default when
you run "terraform init" in the future.

Terraform has been successfully initialized!

You may now begin working with Terraform. Try running "terraform plan" to see
any changes that are required for your infrastructure. All Terraform commands
should now work.

If you ever set or change modules or backend configuration for Terraform,
rerun this command to reinitialize your working directory. If you forget, other
commands will detect it and remind you to do so if necessary.
우리가 random, aws라고 프로바이더를 정의했기 때문에 플러그인을 설치하고, 초기화를 마친다. 이후 terraform plan를 해보면 variables.tf에 설정한 AWS Region를 묻고 있다.
var.region
  AWS Region

  Enter a value:
서울 리전인 ap-northeast-2를 입력하면 플랜을 알려준다.
Terraform used the selected providers to generate the following execution plan. Resource actions are indicated with the following symbols:
  + create

Terraform will perform the following actions:

  # random_id.random_id_prefix will be created
  + resource "random_id" "random_id_prefix" {
      + b64_std     = (known after apply)
      + b64_url     = (known after apply)
      + byte_length = 2
      + dec         = (known after apply)
      + hex         = (known after apply)
      + id          = (known after apply)
    }

Plan: 1 to add, 0 to change, 0 to destroy.
시작은 default 워크스페이스에서 한다. 루트에 기본 terraform.tfstate를 만들어야한다. (이유는 나중에 설명)
terraform workspace select default
이제 plan은 1개를 추가할 것이라는 계획을 알려준다. 아직은 인프라에 아무것도 손을대지 않기 때문에 terraform apply 하면 바로 적용(인프라에 아무것도 하지 않는)에 들어간다.
random_id.random_id_prefix: Creating...
random_id.random_id_prefix: Creation complete after 0s [id=RMY]

Apply complete! Resources: 1 added, 0 changed, 0 destroyed.
그리고 terraform.tfstate.d/dev/terraform.tfstate라는 파일이 생성된다. random_id를 생성했으니 그 랜덤 텍스트를 그대로 담고 있다. 앞으로 이 random_id를 기반으로 인프라에 이름을 설정할 때 사용할 것이다.
{
  "version": 4,
  "terraform_version": "1.3.1",
  "serial": 2,
  "lineage": "fc12cc11-e954-d7ce-5100-5891fae9fa6b",
  "outputs": {},
  "resources": [
    {
      "mode": "managed",
      "type": "random_id",
      "name": "random_id_prefix",
      "provider": "provider[\"registry.terraform.io/hashicorp/random\"]",
      "instances": [
        {
          "schema_version": 0,
          "attributes": {
            "b64_std": "RMY=",
            "b64_url": "RMY",
            "byte_length": 2,
            "dec": "17606",
            "hex": "44c6",
            "id": "RMY",
            "keepers": null,
            "prefix": null
          },
          "sensitive_attributes": []
        }
      ]
    }
  ],
  "check_results": []
}
이 상태값이 로컬에 저장이 되어있든 다른 곳에 저장이 되어야 한다. 왜냐하면 이 파일은 현재 인프라의 상태를 모두 담고 있기 때문에, 설정값이 없어지거나 관리가 안된 경우 매우 처음 인프라를 만든다고 생각하기 때문에, Live 상태에서 변경 사항만 지속적으로 적용하기 위해서는 이 값은 필수이다.
이 상태값을 보관하기 위한 인프라를 구성해보자. 이름은 terraform_live_state라고 이름을 정하고 modules폴더를 만들어준다.
terraform_live_state
modules폴더 아래에 terraform_live_state폴더를 만들고 main.tf, variables.tf, output.tf를 만들어준다.
.
├── main.tf
├── modules
│   └── terraform-live-state
│       ├── main.tf
│       ├── output.tf
│       └── variables.tf
├── terraform.tfstate.d
│   ├── dev
│   │   └── terraform.tfstate
│   ├── prod
│   └── staged
└── variables.tf
Terraform Live State: main.tf
이 모듈은 2개의 AWS 인프라를 만든다. S3 버킷과 DynamoDB인데 S3버킷은 terraform.tfstate를 저장하기 위한 용도이고, DynamicDB는 .terraform.lock.hcl인 lock 파일을 저장한다. lock파일을 DynamoDB Table로 만드는 이유는 여러 개발자가 동시에 인프라를 수정할 때 한 곳의 변경점을 막기 위해 Table을 Lock을 하기 위함이다. Attribute로 이름을 LockID그리고 타입을 S로 지정했다.
주목해야할 부분은 bucket에 Server-side 암호화를 적용했다. SSL AES256알고리즘을 적용하고 버전닝을 활성화 시켰다.
resource "aws_s3_bucket" "terraform_state" {
  bucket = var.s3_terraform_state_bucket_name
}

resource "aws_s3_bucket_versioning" "terraform_state_versioning" {
  bucket = aws_s3_bucket.terraform_state.id
  versioning_configuration {
    status = "Enabled"
  }
}

resource "aws_s3_bucket_server_side_encryption_configuration" "terraform_state_encryption" {
  bucket = aws_s3_bucket.terraform_state.id
  rule {
    apply_server_side_encryption_by_default {
      sse_algorithm = "AES256"
    }
  }
}

resource "aws_dynamodb_table" "terraform_locks" {
  name         = var.dynamodb_terraform_state_locks_table
  billing_mode = "PAY_PER_REQUEST"
  hash_key     = "LockID"

  attribute {
    name = "LockID"
    type = "S"
  }
}
Terraform Live State: variables.tf
루트에서 변수를 내려주기 위해 모듈의 변수를 설정한다.
variable "s3_terraform_state_bucket_name" {
  description = "S3 Terraform state bucket name"
}

variable "s3_terraform_state_key" {
  description = "S3 Terraform state key"
}

variable "dynamodb_terraform_state_locks_table" {
  description = "DynamoDB Terraform state locks table"
}
Terraform Live State: output.tf
생성된 인프라 S3의 arn값과 DynamoDB 테이블 이름을 출력하도록 한다.
output "s3_bucket_arn" {
  value       = aws_s3_bucket.terraform_state.arn
  description = "The ARN of the S3 bucket"
}
output "dynamodb_table_name" {
  value       = aws_dynamodb_table.terraform_locks.name
  description = "The name of the DynamoDB table"
}
이렇게 Terraform Live State라는 인프라는 미리 만들어 두고 난 후 아직 Terraform backend 설정은 하지 않는다.
루트의 메인은 다음과 같이 terraform_live_state를 추가한다.
provider "aws" {
  region = var.region
}

# Terraform state management
# https://blog.gruntwork.io/how-to-manage-terraform-state-28f5697e68fa
# terraform {
#   backend "s3" {
#     bucket = "mystack-terraform-running-state"
#     key    = "global/s3/terraform.tfstate"
#     region = "ap-northeast-2"

#     dynamodb_table = "mystack-terraform-running-locks"
#     encrypt        = true
#   }
# }

# variables used across all modules
locals {
  availability_zones = ["${var.region}a", "${var.region}b", "${var.region}c"]
}

resource "random_id" "random_id_prefix" {
  byte_length = 2
}

module "terraform_live_state" {
  source                               = "./modules/terraform-live-state"
  s3_terraform_state_bucket_name       = "mystack-terraform-running-state"
  s3_terraform_state_key               = "global/s3/terraform.tfstate"
  dynamodb_terraform_state_locks_table = "mystack-terraform-running-locks"
}
이제 default 워크스페이스에서 init > plan > apply를 통해 인프라를 배포한다. 총 4개의 인프라가 배포될 것이며, 이는 Terraform state 관리에 사용될 것이다.
로컬 변수 설정: terraform.tfvars
매번 AWS Region을 입력하는 것은 불편하다. 로컬에서 환경변수를 가질 수 있도록 terraform.tfvars파일을 만들고
region = "ap-northeast-2"
를 만들어 둔다.
Terraform backend 설정
default 워크스페이스에서 Backend 설정을 한다.
provider "aws" {
  region = var.region
}

# Terraform state management
## https://blog.gruntwork.io/how-to-manage-terraform-state-28f5697e68fa
terraform {
  backend "s3" {
    bucket = "mystack-terraform-running-state"
    key    = "global/s3/terraform.tfstate"
    region = "ap-northeast-2"

    dynamodb_table = "mystack-terraform-running-locks"
    encrypt        = true
  }
}

# variables used across all modules
locals {
  availability_zones = ["${var.region}a", "${var.region}b", "${var.region}c"]
}

resource "random_id" "random_id_prefix" {
  byte_length = 2
}

module "terraform_live_state" {
  source                               = "./modules/terraform-live-state"
  s3_terraform_state_bucket_name       = "mystack-terraform-running-state"
  s3_terraform_state_key               = "global/s3/terraform.tfstate"
  dynamodb_terraform_state_locks_table = "mystack-terraform-running-locks"
}
이제 terraform.tfstate를 Terraform backend로 보낸다.
terraform init
Initializing modules...

Initializing the backend...
Do you want to migrate all workspaces to "s3"?
  Both the existing "local" backend and the newly configured "s3" backend
  support workspaces. When migrating between backends, Terraform will copy
  all workspaces (with the same names). THIS WILL OVERWRITE any conflicting
  states in the destination.

  Terraform initialization doesn't currently migrate only select workspaces.
  If you want to migrate a select number of workspaces, you must manually
  pull and push those states.

  If you answer "yes", Terraform will migrate all states. If you answer
  "no", Terraform will abort.

  Enter a value:
yes를 입력하면, 루트에 있는 terraform.tfstate는 비워진다. 그리고 S3 버킷과 DynamoDB에 데이터가 생성된다.
모든 Workspace의 tfstate 만들기
이제 여기까지해서 각 인프라의 워크스페이스(스테이징 환경)에 따라 terraform.tfstate파일을 모두 만들어준다. 기본적으로 생성된 워크스페이스 default에서 시작한다.
여기서부터 워크스페이스는 모두 다시 만든다. 그리고 default 워크스페이스 배포 후 module "terraform_live_state" 블럭은 삭제한다. 이유는 default워크스페이스에서 이미 만들어졌으며, 다른 워크스페이스에서는 이 인프라를 생성하는 것을 필요로 하지 않기 때문이다.
terraform workspace new dev
terraform apply
terraform workspace new staged
terraform apply
terraform workspace new prod
terraform apply
각 다른 워크스페이스에서 인프라(0개)를 배포한 후 S3 콘솔의 구조를 보면
npx s3-tree mystack-terraform-running-state / 10
{
  "global": {
    "s3": {
      "terraform.tfstate": "global/s3/terraform.tfstate"
    }
  },
  "env:": {
    "dev": {
      "global": {
        "s3": {
          "terraform.tfstate": "env:/dev/global/s3/terraform.tfstate"
        }
      }
    },
    "staged": {
      "global": {
        "s3": {
          "terraform.tfstate": "env:/staged/global/s3/terraform.tfstate"
        }
      }
    },
    "prod": {
      "global": {
        "s3": {
          "terraform.tfstate": "env:/prod/global/s3/terraform.tfstate"
        }
      }
    }
  }
}
각 워크스페이스 별로 tfstate가 생성된 것을 확인할 수 있다.
DynamoDB도 확인해보면

Conclusion
인프라 개별적으로는 내용이 너무 길어져서 우선 Workspace 관리와 Terraform backend 삽질기를 바로 잡으면서 써보았다. 나머지 개별 인프라는 따로 주제를 잡아서 포스팅해야할 것 같다. 여튼 이 backend 설정에서 인프라를 배포하다가 tfstate를 분실해서 손으로 모든 인프라를 지운적이 있으므로 첫단추를 잘꿰어야 한다고 느꼈다.
다음 주는 이렇게 인프라를 배포하고 여러 ECS 클러스터를 가동시켜 본 후 인프라 배포는 모두 완료하고 싶다.